
Wednesday, December 5, 2012
2012 Has Been a Blogging Bust
I have been so busy this year. This is the last stitchy thing I stitched up this year. Not sure what I'll do with it, but it will probably be gifted at some point. Maybe I'll gift it to myself. It's from the Sublime Stitching Kokeshi collection.

Monday, November 26, 2012
I'm Not Dead!
Hello there. It's been too long since I've posted and therefore, I have done far too many things between March and now to post, so I will just post what I have been working on recently.
I did take a brief hiatus from much crafting because I just got busy at work and with other responsibilities, so here is a picture of some tiny stitches I have done recently. They are just adorable. They come from Makoto Oozu's cross stitch book.

I plan to make pendants out of all of them but for now, I've just managed to make the one. I used Mod Podge Dimensional Magic resin and it turned yellow, which I do not like. I need to find some that doesn't turn yellow. I can't make and sell pendants that are yellowish. It is not a cute look. Sorry, Mod Podge.

Bazinga!
I am not a fan of The Big Bang Theory, but I came across this pattern on a Pinterest search and wanted to make it for my co-worker Irene. She is a massive Big Bang Theory fan. I think she will absolutely love it!


Saturday, November 3, 2012
Taste The Piehole
I made this for my friend Holly. Our side-business is a bakery called Holly's Piehole and she likes to say "Taste the Piehole", which makes no sense but... okay. I just finished it and need to find a frame to frame it up!
The pie pattern is from Makoto Oozu. I did the rest.

Monday, September 10, 2012
Welcome, Tiny Overlord
I made this for my nephew and gave this to my sister during her shower. He is the first grandson, so he is absolutely going to be an overlord for a while.
Pattern is by Subversive Cross Stitch.


Saturday, March 17, 2012
Easy like...well, Saturday Evening
While my friends are enjoying the final bits of SXSW, seeing The Cult (cry!), and having a Rock Band party equipped with a green screen and crazy glam rock costumes, I am home with El Gripe (the flu). boooo! I so wanted to leave and go to a craft store for fabric, stuff to make cute jewelry, and to make more cute stamps with which to decorate some of said fabric, but I know I should be a good girl and stay home. And instead of leaving and risking passing out all dramatic-like in the fabric aisle, I was good, stayed home, and made some new kind of bows.

These are SUPER easy. Here's how I done 'em!
You'll need felt, scissors, a needle and thread and maybe a tape measure. I only used my tape measure to give you all a good idea of how big to cut the felt. Or you can just go at it and eyeball what you think will be a good size.
Cut your rectangle. Mine is 4" x 2.5". Also, cut a little strip of felt for the bow's middle. Round the corners of the rectangle.

Squish the rectangle, like so:

Wrap your strip around the middle and sew, or you can hot glue it. I just don't trust hot glue to hold certain things.
Viola! A cute and really easy bow!

These are SUPER easy. Here's how I done 'em!
You'll need felt, scissors, a needle and thread and maybe a tape measure. I only used my tape measure to give you all a good idea of how big to cut the felt. Or you can just go at it and eyeball what you think will be a good size.
Cut your rectangle. Mine is 4" x 2.5". Also, cut a little strip of felt for the bow's middle. Round the corners of the rectangle.
Squish the rectangle, like so:
Wrap your strip around the middle and sew, or you can hot glue it. I just don't trust hot glue to hold certain things.
Viola! A cute and really easy bow!
Tuesday, March 6, 2012
So Good...
Happy Texas Independence Day! I am so proud to be Texan. We have the most interesting history and I love Texas Pride!
I was contacted on Etsy to do a custom piece. They wanted it to say "So Good", so I created the pattern and sent it over. They approved it, I stitched it up and in a few minutes I'm going to HEB to sell it! I will get $15 for it so not bad! Thank you, customer whose name I've already forgotten!
Here is a pic of it propped up against my cute thermoses! How cool is the cross stitch one??

Saturday, February 25, 2012
Hair pins and bows and pendants
I have been making these cute hair bows and pins. The pins are fabric buttons I made.


 I also stitched up some pendants, just using some random designs. I'm not sure what I think about them. I had to wrap the embroidery around a piece of cardboard so it doesn't really fit nicely into the cabochon. There has to be a better way.
 I also stitched up some pendants, just using some random designs. I'm not sure what I think about them. I had to wrap the embroidery around a piece of cardboard so it doesn't really fit nicely into the cabochon. There has to be a better way.
Sunday, February 5, 2012
Bees Knees Industries
Just a cute little Cate Anevski/Bees Knees Industries bear for today.
I'm sure if she knew I referred to her as "Cute Anevski" she would be annoyed or creeped out, or maybe both.


Sunday, January 15, 2012
Mini Bookshelf Wall Hanging
Hi everyone! It is my birthday and here I am with a DIY!
This is a tiny and cute bookshelf hanging. Here is how I did it.
You'll need:

This is a tiny and cute bookshelf hanging. Here is how I did it.
You'll need:

- Paint in a color of your choice
- a small wooden plaque
- a miniature bookshelf (I got mine at Hobby Lobby)
- miniature books (also at Hobby Lobby)
- wood glue
- a picture hanger
Paint the plaque whatever color you want. While it's drying, glue the mini books together.


When the glue has dried, pure more glue on the bottom of the row of books and press it onto the bookshelf.


When the books have dried on the bookshelf, glue the whole thing to the plaque.
When that's dry, glue a hanger to the back. I used Amazing Goop for mine and let it dry for a couple of days.

TA-DAH!


Sunday, January 8, 2012
Love is in the Air
This probably fits better in a Valentine's Day post. However, my sister is getting married in a couple of weeks, so love-themed things are on my mind.

I did this for my boyfriend. It's framed in a 4" frame and took me about half an hour to stitch up. I washed and dried it so that it's not all stiff and you can't see the transfer lines.

I did this for my boyfriend. It's framed in a 4" frame and took me about half an hour to stitch up. I washed and dried it so that it's not all stiff and you can't see the transfer lines.
Sunday, January 1, 2012
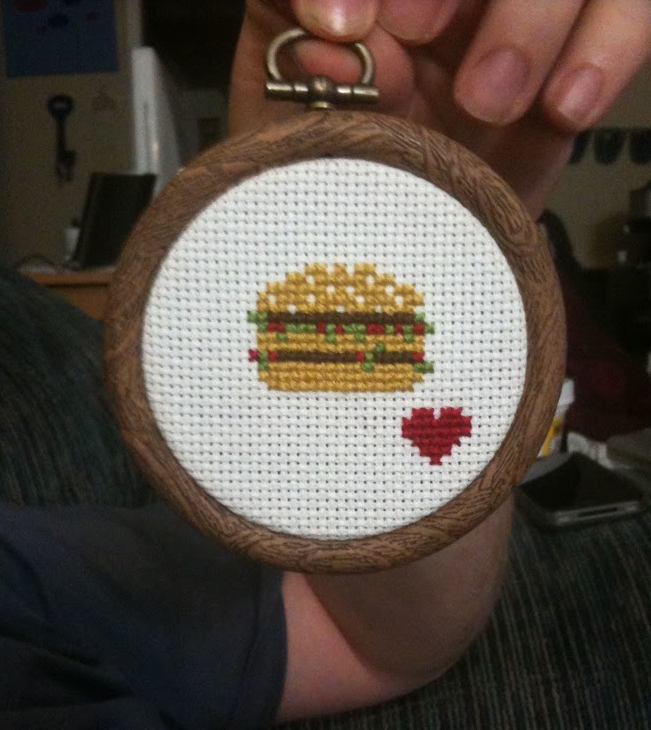
What I've Been Doing
Here are some photos of things I've done over the past few months. The cheeseburger is from Mrs. Wooly and the rest are from the Makoto Oozu book. 
Subscribe to:
Posts (Atom)